NestJS Request Lifecycle: What Happens Before and After Your Controller
Once you understand modules, controllers, providers, dependency injection, TypeScript, and decorators, the next big question is:
What actually happens when a request enters a NestJS app?
Because this is the part where Nest can start feeling slightly magical again.
You hear terms like:
- middleware
- guards
- pipes
- interceptors
- exception filters
and very quickly it can feel like your request is being passed through a secret underground tunnel system before it ever reaches your controller.
The good news is that the flow is actually pretty logical.
And once you understand the request lifecycle, a lot of NestJS starts to click in a much deeper way.
In this article, we will make that flow simple.
By the end, you will understand:
- the order a request moves through NestJS
- what each layer is responsible for
- why some tools belong before the controller and others after
- where validation, auth, logging, and error handling fit
- how to stop mixing these concepts up
Let’s build the mental flowchart.
Why the Request Lifecycle Matters
You can build a few NestJS routes without fully understanding the lifecycle.
But at some point, confusion starts showing up.
For example:
- “Should I do this in middleware or a guard?”
- “Why is my pipe running here?”
- “Why is my interceptor wrapping the response?”
- “Why didn’t my controller run?”
- “Where does exception handling actually happen?”
These questions are all lifecycle questions.
And if you understand the request lifecycle, you stop guessing where things belong.
That makes your code cleaner, and honestly, it saves a lot of unnecessary framework confusion.
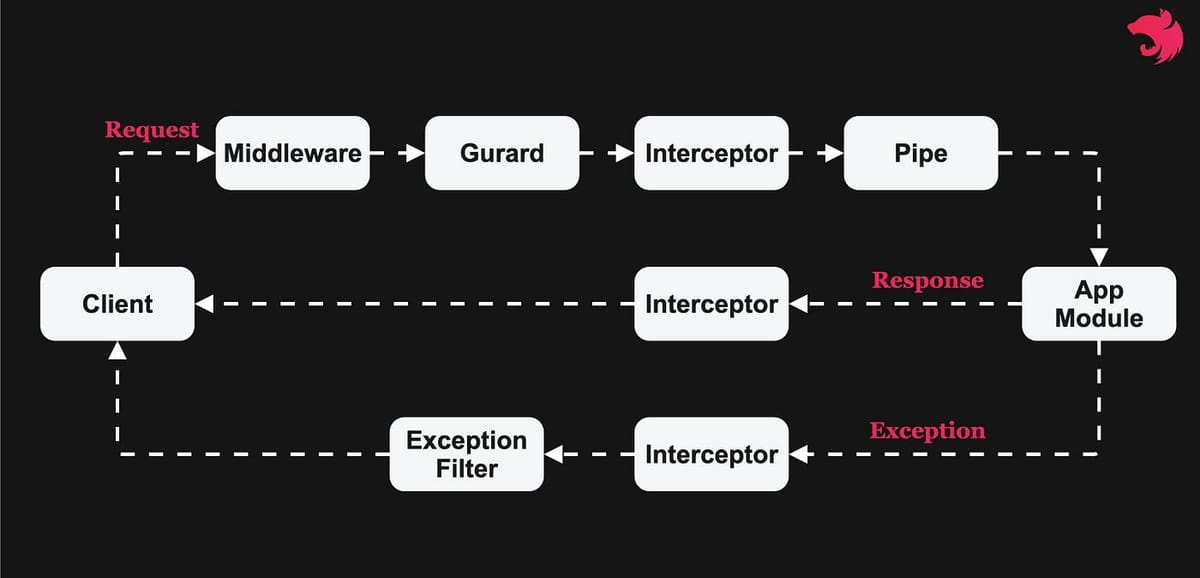
The High-Level NestJS Request Flow
Nest’s official request lifecycle guide says the general flow is:
middleware → guards → interceptors → pipes → controller/route handler → back through interceptors on the response path.

That is the main shape.
In plain English:
- the request enters the app
- middleware runs first
- guards decide whether the request is allowed
- interceptors can wrap what happens next
- pipes transform or validate incoming data
- the controller method runs
- the response goes back out, often through interceptors again
- if something throws, exception handling steps in
That is the flow.
Already less scary, right?
A Simple Mental Model
If you want the beginner-friendly version, think of it like this:
- Middleware = first checkpoint
- Guards = permission check
- Interceptors = wrapper around execution
- Pipes = input cleanup and validation
- Controller = route handler
- Exception filters = error rescue layer
That model is not academically fancy.
But it is very useful.
And useful beats fancy.
Step 1: Middleware Runs First
Nest’s middleware docs say middleware runs before the route handler and has access to the request, response, and the next() function in the request-response cycle. The request lifecycle FAQ also notes that globally bound middleware runs before module-bound middleware, and middleware runs in binding order.
So middleware is the first thing that gets a shot at the request.
What Middleware Is Good For
Middleware is useful for things like:
- logging
- adding request metadata
- parsing or adjusting request details
- simple cross-cutting tasks
- early request processing
What Middleware Is Not Great For
Middleware is usually not the best place for:
- route-aware authorization rules
- business logic
- validation tied closely to handler arguments
Why?
Because middleware runs early and does not know much about which specific controller method is about to execute. Guards, on the other hand, do know the execution context of the next handler. :contentReference[oaicite:3]{index=3}
Example
A simple logging middleware might:
- log the method
- log the URL
- attach a request ID
- call
next()
That is a good fit.
Trying to make middleware handle all role-based permission logic?
Usually not a great fit.
Step 2: Guards Decide Whether the Request Can Continue
Nest’s guards docs say guards have a single responsibility: they determine whether a given request will be handled by the route handler, depending on runtime conditions like roles, permissions, or other auth rules.
This is why guards are such a natural fit for:
- authentication
- authorization
- role checks
- permission checks
- route access rules
Why Guards Are Better Than Middleware for Auth Decisions
Middleware can inspect the request.
But guards know more.
They have access to the ExecutionContext, which means they know what handler and route are about to run. Nest explicitly calls this out as a key reason guards are more appropriate than middleware for authorization-style logic.
That makes guards much better for questions like:
- Is this user logged in?
- Does this user have the admin role?
- Should this route be blocked?
Simple Guard Mental Model
A guard basically asks:
“Should this request be allowed to continue?”
If yes, the flow continues.
If no, the handler never runs.
Which is why guard failures often feel dramatic.
Because they are.
Step 3: Interceptors Wrap the Route Execution
Nest’s interceptor docs describe interceptors as tools inspired by AOP that can run logic before and after method execution, transform returned data, transform thrown exceptions, extend behavior, or even completely override a function in certain cases.
This makes interceptors extremely powerful.
What Interceptors Are Good For
Interceptors are great for:
- response transformation
- logging execution time
- wrapping API responses
- caching patterns
- cross-cutting behavior before and after execution
Why Interceptors Feel Special
Interceptors are different from middleware and guards because they wrap the actual execution.
That means they can:
- do something before the controller runs
- let the controller run
- do something after the controller returns
So if middleware is the front door, interceptors are more like a smart wrapper around the whole controller action.
That is why they are so useful.
A Very Common Example
A response interceptor might turn this:
{ "id": 1, "name": "Alice" }into this:
{ "data": { "id": 1, "name": "Alice" } }Now every response follows a consistent format.
That is a classic interceptor job.
Step 4: Pipes Validate or Transform Data
Nest’s pipes docs say pipes operate on the arguments being processed by a controller route handler, and Nest places a pipe just before a method is invoked. Pipes are mainly for transformation and validation. They also run inside the exceptions zone, so if a pipe throws, the controller method does not execute.
This is one of the most important lifecycle details for beginners.
What Pipes Are Good For
Pipes are perfect for:
- validating DTOs
- transforming route params
- parsing incoming values
- enforcing input correctness before the handler runs
Why Pipes Belong So Close to the Controller
Pipes work on the actual method arguments.
That means they are not just dealing with the raw request in a generic way.
They are dealing with the exact data that will be passed into your controller method.
That is why they are a much better fit than middleware for validation.
Example
If your route expects an id as a number, a pipe can:
- take the raw string param
- transform it into a number
- reject it if it is invalid
Very useful.
Very focused.
Very much not a middleware job.
Step 5: The Controller Route Handler Runs
Nest’s controller docs still define controllers as the classes responsible for handling incoming requests and sending responses back to the client.
This is the part most beginners understand first, because it looks the most familiar.
You define a route like:
@Get(':id')
findOne(@Param('id') id: string) {
  return this.usersService.findOne(id);
}
By the time your controller method runs:
- middleware has already run
- guards have already allowed the request
- interceptors have already wrapped the execution
- pipes have already validated or transformed inputs
That means the controller should get cleaner, safer data.
Which is great.
Because controllers should focus on:
- handling the route
- delegating to providers/services
- returning the result
Not doing every job in the framework all by themselves.
Step 6: The Response Travels Back Out Through Interceptors
This is one of the trickiest parts for beginners.
Interceptors are involved on the way in and also on the way out.
Nest’s request lifecycle FAQ explicitly says the request goes to interceptors before pipes and then returns back through interceptors as the response is generated. The interceptor docs also explain they can transform the result returned from a function.
That is why interceptors are such a natural place for:
- formatting response payloads
- timing requests
- mapping return values
- adding metadata to responses
So if you are wondering why response wrapping is usually done in an interceptor instead of a controller, this is the reason.
Interceptors sit in exactly the right place.
Where Exception Filters Fit In
Exception filters are the part that handles thrown exceptions in a more structured way. Pipes also run inside the exceptions zone, which means errors thrown there are handled by the exceptions layer too.
Here is the simple version:
if something goes wrong in the lifecycle, exception handling steps in
That error might come from:
- a guard
- a pipe
- a provider
- a controller
- an interceptor
- deeper application logic
Exception filters help turn those errors into cleaner, more controlled responses.
What Exception Filters Are Good For
They are useful for:
- standardizing error responses
- handling framework or custom exceptions
- preventing ugly or inconsistent error output
- creating cleaner API error shapes
So while exception filters are not usually presented as one of the main forward steps in the request flow, they are absolutely part of the request lifecycle story.
They are the cleanup crew when something throws.
The Real Beginner Question: Which Tool Should I Use?
This is where people get stuck.
So here is the simplest version.
Use Middleware When
- you need early request processing
- you want generic logging
- you want to attach request metadata
- you need a broad pre-handler step
Use Guards When
- you need to decide if the request is allowed
- you are checking auth or permissions
- access control depends on the upcoming handler
Use Pipes When
- you need to validate or transform input
- the logic is about controller method arguments
- you want to reject bad input before the handler runs
Use Interceptors When
- you want to wrap execution
- you want logic before and after the handler
- you want to transform responses
- you want cross-cutting behavior like timing or response mapping
Use Exception Filters When
- you want better control over thrown errors
- you want standardized error output
- you want cleaner API failures
That is the practical cheat sheet.
A Full Example Flow
Let’s imagine a request comes in:
GET /users/42
Authorization: Bearer token
Here is how the lifecycle might look:
1. Middleware
A logger middleware records:
- request method
- URL
- request time
2. Guard
An auth guard checks the token.
If the token is invalid, the request stops here.
3. Interceptor
A timing interceptor starts measuring how long the request takes.
4. Pipe
A pipe validates that 42 is a valid numeric ID.
5. Controller
The controller method receives the cleaned input and calls the service.
6. Service / Provider
The provider fetches the user.
7. Interceptor Again
The interceptor wraps the response and logs execution time.
8. Final Response
The client receives a clean response.
If an error happens at one of those stages, exception handling shapes the failure response.
That is the lifecycle in action.
Why Understanding This Makes You Better at NestJS
A lot of NestJS confusion is not really about syntax.
It is about putting logic in the wrong place.
For example:
- auth in middleware when it should be in guards
- validation in controllers when it should be in pipes
- response formatting in controllers when it should be in interceptors
- inconsistent errors when exception filters should help
Once you understand the lifecycle, these decisions get easier.
And your code starts feeling more “Nest-like.”
Which usually means:
- cleaner
- more maintainable
- easier to test
- easier to reason about
That is a very good upgrade.
Common Beginner Mistakes
1. Treating Middleware and Guards as the Same Thing
They are not.
Middleware runs early and is more generic.
Guards decide whether the route handler should execute, and they know the execution context.
2. Doing Validation in Controllers
You can, but that is usually a sign pipes should be doing the job.
3. Forgetting That Interceptors Work on the Way Back Too
This is why they are so useful for response formatting.
4. Putting Too Much in One Layer
If your middleware logs, authenticates, validates, transforms responses, and handles errors, it is trying to live five different lives at once.
That is not ideal.
5. Ignoring Exception Handling Until Later
This often works fine until it very much does not.
A Good Mental Shortcut to Remember
Here is the short version to keep in your head:
- Middleware touches the request early
- Guards decide if the request may continue
- Interceptors wrap the whole execution
- Pipes clean and validate input
- Controllers handle the route
- Exception filters clean up thrown errors
If that sentence sticks, you are already in good shape.
Final Thoughts
The NestJS request lifecycle sounds complicated at first because there are several moving pieces.
But the logic behind it is actually pretty clean.
A request comes in.
Middleware sees it first.
Guards decide whether it is allowed.
Interceptors wrap what happens next.
Pipes validate and transform input.
The controller runs.
The response comes back out, often through interceptors again.
And if something fails, exception handling keeps things under control.
Once you understand that flow, a lot of NestJS starts feeling much more intentional.
And that is exactly what we want.
Because the next step is diving into one of the most practical layers in that flow:
That is where you will really start making your input handling cleaner, safer, and much less chaotic.
Real Interview Questions
What is the NestJS request lifecycle?
It is the sequence a request follows inside a NestJS application, generally moving through middleware, guards, interceptors, pipes, the controller/handler, and then back through interceptors on the response path.
Do pipes run before or after the controller?
Before. Nest places pipes just before the route handler method is invoked.
What is the difference between middleware and guards in NestJS?
Middleware runs early and is more generic. Guards specifically decide whether the request should be handled by the route handler and have access to the execution context.
Why are interceptors useful in NestJS?
Because they can wrap the execution, run logic before and after the handler, and transform returned data or exceptions.
Where do exception filters fit in NestJS?
They handle thrown exceptions in a structured way, helping standardize error responses across the app. Pipes also run inside the exceptions zone, so errors thrown there are handled by the exceptions layer.