How to Test NestJS Applications: Unit, Integration, and e2e
Sooner or later, every developer reaches the same testing moment:
You change one small thing.
Something else breaks.
You stare at the screen.
The screen stares back.
That is when testing stops feeling like a “nice extra” and starts feeling like survival.
If you are learning NestJS, testing can look a little intimidating at first because suddenly people are throwing around terms like:
- unit test
- integration test
- e2e test
- mocks
- testing module
- Supertest
- provider overrides
And if you are new, it can feel like the testing world has its own secret language and a very strong opinion about everything.
The good news is this:
you do not need to master every testing strategy on day one
What you do need is a clear mental model.
In this article, we will make that model simple.
By the end, you will understand:
- the difference between unit, integration, and e2e tests
- how NestJS testing works
- what
@nestjs/testingis for - when to mock dependencies
- where beginners should start
- how to build confidence without overcomplicating everything
Let’s make testing feel useful instead of scary.
Why Testing Matters in NestJS
A NestJS app is usually made of many connected parts:
- controllers
- providers
- DTOs
- guards
- pipes
- interceptors
- modules
- configuration
- sometimes databases and external services
That means even a “small change” can have wider effects than you expected.
Testing helps you answer questions like:
- does this service still work?
- did this route break?
- are inputs validated properly?
- does this guard still block unauthorized access?
- does the whole request flow still behave correctly?
Nest’s official testing docs still position testing as a first-class part of the framework, with dedicated tools for building isolated test modules and full application tests.
So yes, testing is extra work.
But it is the kind of extra work that saves you from much worse work later.
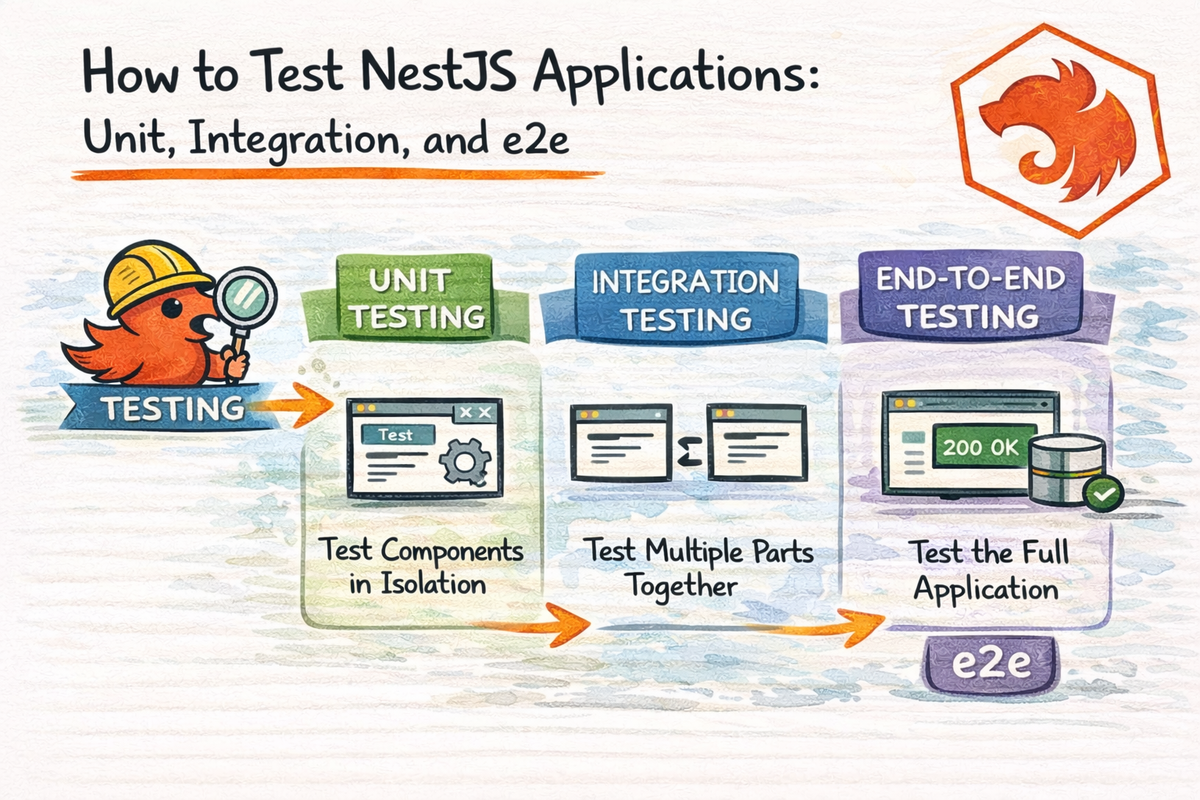
The 3 Main Test Types You Need to Know
Let’s start with the big picture.
1. Unit Tests
A unit test checks one small piece of logic in isolation.
Usually:
- one service
- one method
- one function
- one guard
- one pipe
The main idea is:
test one thing without depending on the whole app
2. Integration Tests
An integration test checks how multiple parts work together.
Usually:
- controller + service
- module wiring
- service + repository
- validation + handler logic
The main idea is:
test collaboration between pieces
3. e2e Tests
An end-to-end test checks the whole application flow like a real user or API client would experience it.
Usually:
- start the app
- send HTTP requests
- verify status codes and responses
The main idea is:
test the app from the outside
That is the basic map.
And once you understand that map, testing becomes much less mysterious.
A Simple Mental Model
If you want the most beginner-friendly version, use this:
- unit test = test one piece
- integration test = test connected pieces
- e2e test = test the real app flow
That alone will help a lot.
Because a lot of confusion starts when people hear those terms but never build a clean mental boundary between them.
How NestJS Testing Works
Nest’s testing package still revolves around @nestjs/testing and Test.createTestingModule(), which lets you create a lightweight Nest test module with controllers, providers, and other dependencies.
That is the core testing tool in Nest.
It means your tests can work with Nest’s real dependency injection system instead of pretending the framework does not exist.
That is a big deal.
Because one of Nest’s main strengths is structure, and the testing tools are designed to respect that structure.
So instead of doing weird manual setup everywhere, you can create a testing module that feels a lot like a small app container.
Very useful.
The Starter Test File Nest Gives You
When you generate a Nest app, Nest usually gives you starter .spec.ts files.
For example:
app.controller.spec.ts
This is not random.
Nest is basically telling you from day one:
“Testing is part of the workflow here.”
That is a good habit.
And even if you do not fully understand the generated test file at first, it is still a nice signal that testing is supposed to be normal, not some optional side quest.
Part 1: Unit Testing in NestJS
Unit tests are the best place for beginners to start.
Why?
Because they are:
- smaller
- faster
- easier to reason about
- less dependent on app-wide setup
Nest’s testing docs still show service-level unit tests built with Test.createTestingModule() and direct retrieval of the service instance from the module.
What to unit test first
A good beginner target is:
- a service
- a pipe
- a guard
- a helper-like provider
Services are especially good because they usually hold business logic.
And business logic is exactly what you want confidence in.
A Simple Unit Test Example
Imagine this service:
import { Injectable } from '@nestjs/common';

@Injectable()
export class PostsService {
  private posts = [
    { id: 1, title: 'Hello NestJS' },
    { id: 2, title: 'Testing is useful' },
  ];

  findAll() {
    return this.posts;
  }

  findOne(id: number) {
    return this.posts.find((post) => post.id === id);
  }
}
A basic unit test could look like this:
import { Test, TestingModule } from '@nestjs/testing';
import { PostsService } from './posts.service';

describe('PostsService', () => {
  let service: PostsService;

  beforeEach(async () => {
    const module: TestingModule = await Test.createTestingModule({
      providers: [PostsService],
    }).compile();

    service = module.get<PostsService>(PostsService);
  });

  it('should return all posts', () => {
    expect(service.findAll()).toHaveLength(2);
  });

  it('should return one post by id', () => {
    expect(service.findOne(1)).toEqual({ id: 1, title: 'Hello NestJS' });
  });
});
This matches the standard Nest testing style:
- create a testing module
- register providers
- compile the module
- retrieve the provider instance
- run assertions
That pattern is still the backbone of official examples.
Why Unit Tests Are So Useful
Unit tests are great because they tell you whether your logic works without needing:
- a running server
- a full request lifecycle
- a database
- a real auth system
- a full app boot
That makes them:
- fast
- focused
- easy to run often
They are especially useful when you want confidence in business rules.
For example:
- does price calculation work?
- does filtering logic work?
- does role checking logic work?
- does a transformation function return what you expect?
Very practical.
Very worth doing.
When to Mock Dependencies
This is where a lot of testing questions start.
If your service depends on something external, like:
- a repository
- another service
- an email client
- a third-party API
you often do not want the real dependency in a unit test.
Why?
Because then your “unit” test is no longer really isolated.
Nest’s testing docs still support overriding providers and supplying mock values in the testing module so units can be tested without their real dependencies.
Example mock provider:
const mockPostsRepository = {
  find: jest.fn().mockResolvedValue([{ id: 1, title: 'Mocked post' }]),
};
Then use it in the test module:
const module: TestingModule = await Test.createTestingModule({
  providers: [
    PostsService,
    {
      provide: 'POSTS_REPOSITORY',
      useValue: mockPostsRepository,
    },
  ],
}).compile();
That way you are testing your service logic, not whether the actual database is alive today.
A very good distinction.
Part 2: Integration Testing in NestJS
Integration tests sit in the middle.
They are broader than unit tests but narrower than e2e tests.
The goal is to test how parts of your application work together.
Examples:
- controller + service
- module + provider wiring
- validation + controller
- service + mocked repository
- guard + controller route
Nest’s testing tools still let you compose these pieces together in a real Nest testing module, which makes integration testing feel very natural in the framework.
Why integration tests matter
A service may work by itself.
A controller may look correct.
But the real question is:
Do they still behave correctly together?
That is what integration tests help answer.
A Simple Controller + Service Integration Test
Imagine a PostsController that uses PostsService.
import { Controller, Get } from '@nestjs/common';
import { PostsService } from './posts.service';

@Controller('posts')
export class PostsController {
  constructor(private readonly postsService: PostsService) {}

  @Get()
  findAll() {
    return this.postsService.findAll();
  }
}
An integration-style test could look like this:
import { Test, TestingModule } from '@nestjs/testing';
import { PostsController } from './posts.controller';
import { PostsService } from './posts.service';

describe('PostsController', () => {
  let controller: PostsController;

  beforeEach(async () => {
    const module: TestingModule = await Test.createTestingModule({
      controllers: [PostsController],
      providers: [PostsService],
    }).compile();

    controller = module.get<PostsController>(PostsController);
  });

  it('should return all posts through the controller', () => {
    const result = controller.findAll();
    expect(result).toHaveLength(2);
  });
});
This is not a full real HTTP test.
But it does test the interaction between controller and service.
That is what makes it more integration-like than a pure unit test.
Part 3: e2e Testing in NestJS
End-to-end tests are the most realistic.
Nest’s testing docs still show e2e tests creating a full Nest application instance with moduleFixture.createNestApplication(), calling app.init(), and then using Supertest to send real HTTP requests.
That means you test the app more like a real API client would.
This is very valuable because it exercises:
- routing
- middleware
- guards
- pipes
- interceptors
- exception filters
- controller logic
- actual HTTP responses
So if unit tests ask:
“Does this small piece work?”
e2e tests ask:
“Does the real app behave correctly from the outside?”
A Simple e2e Test Example
Nest commonly pairs e2e tests with Supertest, and the official docs continue to use it for HTTP assertions against the test app instance.
Example:
import { Test, TestingModule } from '@nestjs/testing';
import { INestApplication } from '@nestjs/common';
import * as request from 'supertest';
import { AppModule } from './../src/app.module';

describe('Posts API (e2e)', () => {
  let app: INestApplication;

  beforeEach(async () => {
    const moduleFixture: TestingModule = await Test.createTestingModule({
      imports: [AppModule],
    }).compile();

    app = moduleFixture.createNestApplication();
    await app.init();
  });

  it('/posts (GET)', () => {
    return request(app.getHttpServer())
      .get('/posts')
      .expect(200);
  });

  afterEach(async () => {
    await app.close();
  });
});
This is much closer to “real life” than directly calling a controller method.
And that is the whole point.
Why e2e Tests Are So Powerful
e2e tests help catch problems that unit tests miss.
For example:
- route decorators are wrong
- validation pipe is not configured
- guards block unexpectedly
- global interceptors change response shape
- exception filters affect output
- the module wiring is broken
These are things that unit tests often do not see.
That is why e2e tests are so useful for high-confidence endpoints.
They tell you whether the app actually behaves correctly as a system.
Very important.
So Where Should Beginners Start?
This is probably the most practical question in the whole chapter.
Here is the honest answer:
Start with unit tests
Because they are simpler and give you the fastest learning curve.
Add integration tests where collaboration matters
Especially around controllers and services.
Use e2e tests for important request flows
Especially:
- auth routes
- validation-sensitive endpoints
- critical CRUD flows
- public API behavior
That is a healthy progression.
Do not try to build a giant testing strategy on day one.
Start with the small tests that give real confidence.
That is enough.
What to Test First in a NestJS App
A very good beginner-first testing list looks like this:
1. Service logic
This gives the most value early.
2. Validation-sensitive routes
Because broken input handling can get weird fast.
3. Auth-protected routes
Guards and route protection are worth verifying.
4. Important CRUD flows
Especially create, update, and delete behavior.
5. Shared reusable logic
If many parts of your app depend on it, it is worth testing.
That is a very practical place to begin.
Common Beginner Mistakes
Let’s save you some frustration.
1. Trying to test everything at once
This is how people burn out on testing before it becomes helpful.
Start small.
2. Confusing integration tests with e2e tests
If you are not starting a real app and sending real HTTP requests, it is usually not a full e2e test.
3. Avoiding mocks when unit testing
If a unit test depends on real external systems, it often becomes fragile and less focused.
4. Writing tests that only check “defined”
This is a classic beginner test:
expect(service).toBeDefined();
That is okay as a smoke check.
But it is not enough by itself.
Test behavior, not just existence.
5. Making tests too tightly coupled to internal implementation
Try to test meaningful behavior rather than every tiny private detail.
6. Ignoring failing tests because “the app still runs”
That is how testing slowly turns into decorative paperwork.
Not ideal.
A Good Mental Model to Remember
Here is the easiest way to keep the three test types clear:
- unit test = one piece in isolation
- integration test = connected pieces together
- e2e test = full app behavior from the outside
If that sentence sticks, you are already ahead of a lot of beginner confusion.
How NestJS Makes Testing Nicer
One reason testing in NestJS feels better than in some loosely structured apps is that the framework already encourages separation:
- controllers handle requests
- services handle logic
- modules organize structure
- DI makes mocking easier
That architecture helps testing a lot.
Because code that is structured well is usually easier to test well.
And that is one of the quieter strengths of Nest.
Why You Do Not Need Perfect Test Coverage on Day One
This matters.
Beginners sometimes think testing only counts if they suddenly have:
- massive test coverage
- every edge case
- flawless mocks
- a full CI setup
- zero uncertainty
Nope.
A better mindset is:
Write the tests that reduce the most risk first.
That usually means:
- important business logic
- fragile flows
- auth-sensitive behavior
- validation-heavy endpoints
That is more realistic.
And much more sustainable.
Final Thoughts
Testing in NestJS becomes much easier once you stop treating all tests like the same thing.
Nest’s current testing docs still provide a very clean path:
- use
@nestjs/testingandTest.createTestingModule()for structured tests, - use mocks and provider overrides when isolating units,
- and use a full Nest application instance plus Supertest when doing e2e HTTP tests.
So the key idea is simple:
- use unit tests for isolated logic
- use integration tests for collaboration between parts
- use e2e tests for real request flows
That is the foundation.
And once you have that, your app starts feeling much more trustworthy.
Because instead of hoping nothing broke, you can actually check.
That is a pretty nice upgrade.
And now that you understand how to verify NestJS behavior, the next step is learning how to debug things when they still go wrong anyway.
Because yes, they still will.
Just hopefully less dramatically.
Real Interview Questions
What is the difference between unit, integration, and e2e tests in NestJS?
A unit test checks one small piece in isolation, an integration test checks multiple parts working together, and an e2e test checks full application behavior through real HTTP-style requests.
What package does NestJS use for testing?
Nest provides @nestjs/testing, which includes tools like Test.createTestingModule() for building test modules.
How do I test HTTP endpoints in NestJS?
The standard approach is to create a Nest application instance in the test and use Supertest to send requests and assert responses.
Do I need to mock dependencies in NestJS tests?
Often yes for unit tests, especially when the real dependency is external or would make the test less focused. Nest’s testing tools support provider overrides and mock values for this reason.